 So now onto working with the resin! You'll need about 8 oz of resin if you made a river as large as mine (enough to span 6 feet.) You need resin that will dry clear. I used EnviroTex Lite pour-on resin as you can see in the pic to the left. If you cannot find this (I bought mine at AC Moore but you should be able to find it in the woodworking section at most larger craft stores) you can use GW or Woodland Scenics Water Effects and apply a couple coats.
 If you have them, some latex gloves are a good idea to use. That way if any resin gets onto your hands it's no big deal. So first off was to mark cups at 4 oz. To do this take 2 clear/frosted plastic cups and use a measuring cup and pour a half cup of water into each plastic cup and mark it with a sharpie marker. If you're making smaller spans of river or making a pond or digestion pool or something of that effect, you can use less. Just be sure to use EQUAL amounts of resin and hardener! So anyway, dry the cup with a paper towel so there is no water left inside. Next up, pour the resin into one cup to the 4 oz mark you made. Then pour the hardener into the other cup to the 4 oz mark. Pour the hardener into the resin and mix for two minutes to be sure the two components are completely integrated with each other.
 Next, pour some of the resin onto a river section where the water is supposed to be. Using an old brush, that you don't mind tossing after this project, spread the resin around so that the area between the two river banks is covered and looks wet. If you added any sand in the middle don't totally cover this but do cover the edges. This will make it look semi-submerged. If you made a fordable area like i did in the pic to the left, you can lightly apply some of the resin to look like the water is still flowing through but is quite shallow and able to be crossed easily.
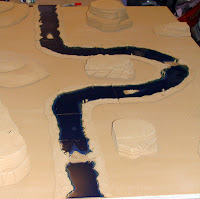
 Do this for each piece of your river section. I made seven (A-G) to span my desert board. If you look at the pic to the right you can see how it looks on the board... Now I have my own Nile river running through my desert! Good luck making yours!
Til next time,
Steevo


No comments:
Post a Comment